Laragon is a powerful local development environment that simplifies the process of managing web servers, databases, and other tools. One of its standout features is its integration with HeidiSQL, a lightweight and user-friendly database management tool. While HeidiSQL is incredibly efficient, many users are unaware of how to export MySQL databases into an SQL file using this tool. In this blog post, we’ll walk you through the step-by-step process of exporting a MySQL database in Laragon using HeidiSQL.
Why Export a MySQL Database?
Exporting a MySQL database is a common task for developers. Whether you’re backing up your data, migrating to a new server, or sharing your database structure with a team, having a reliable export process is essential. HeidiSQL makes this process straightforward, but it’s important to follow the correct steps to ensure your exported SQL file includes both the database structure and its data.
Step-by-Step Guide to Exporting a MySQL Database in Laragon
Step 1: Open Laragon
Start by launching Laragon on your system. Ensure that the MySQL server is running. You can check this by looking at the Laragon system tray menu—MySQL should be listed as “Running.”
Step 2: Open “Databases”
In the Laragon interface, click on the “Database” button. This will open HeidiSQL, the default database management tool in Laragon.
Step 3: Open the MySQL Session
In HeidiSQL, you’ll see a list of MySQL sessions. Open the session that contains the database you want to export. If you haven’t set up a session yet, you can create a new one by specifying the connection details.
Step 4: Log in to MySQL
When prompted, enter your login details:
- Username: Typically, the default username is
root. - Password: In most cases, there is no password unless you’ve configured one.
Click “Open” to connect to the MySQL server.
Step 5: Locate the Database
Once connected, you’ll see a list of databases on the left-hand side of the HeidiSQL interface. Navigate to the database you want to export.
Step 6: Right-Click and Select “Export Database as SQL”
Right-click on the database name and select “Export database as SQL” from the context menu. This will open the export settings window.
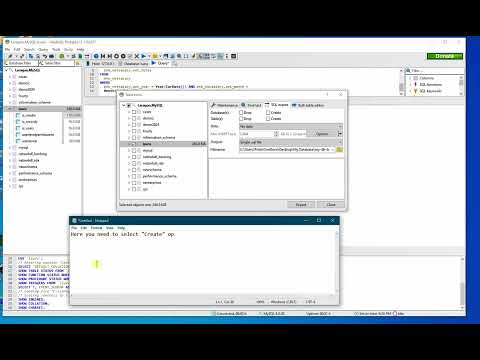
Step 7: Configure Export Options
In the export settings window, you’ll need to configure the following options:
- Databases: Select the “Create” option to include the database structure in the export.
- Tables: Select the “Create” option to include the table structure.
- Data: Select the “Insert” option to include the actual data in the export.

Note: If you don’t select the “Insert” option for data, the exported SQL file will only contain the database and table structures without any data.
Step 8: Click “Export”
Once you’ve configured the settings, click the “Export” button. HeidiSQL will begin the export process, and you’ll see the progress details at the bottom of the interface.
Step 9: Verify the Exported SQL File
After the export is complete, you’ll have an SQL file containing your database structure and data. You can use this file for backups, migrations, or sharing with others.
Video Tutorial
For a visual guide, check out this helpful YouTube video that demonstrates the process of exporting a MySQL database using HeidiSQL:
Conclusion
Exporting a MySQL database in Laragon using HeidiSQL is a simple yet powerful process. By following the steps outlined in this guide, you can ensure that your exported SQL file includes both the database structure and its data. Whether you’re a beginner or an experienced developer, this method will help you efficiently manage your databases.
If you found this guide helpful, feel free to share it with others who might benefit from it. Happy coding! 🚀


It¦s really a nice and helpful piece of info. I am happy that you simply shared this helpful info with us. Please stay us up to date like this. Thank you for sharing.